April 10, 2025 : I’m Feeling Giddy – Time For C2E2
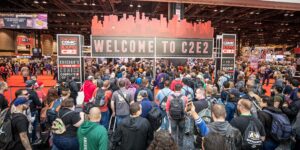
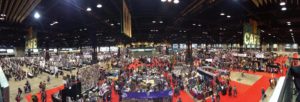
I know, Giovanni needs to chill. But how can he? C2E2 weekend kicks off tomorrow, and I know I’m stoked. Moridin and I have been going since 2015 (with a small break due to Covid… I forget if we missed one or two?).
No dressing up this year, which isn’t necessarily a bad thing. It means more time to enjoy the floor and maybe even a few panels – something I couldn’t really do last year. There isn’t much that stands out, though… except for the Futurama Reunion?
The over/under for Vegeta sightings: 7. However, I wonder if there will be more due to Daima. Cardboard Box Vegeta counts for 15.
posted by Pi Visuals at 4:40 pm
Tags: C2E2 , DBZComment
May 11, 2024 : C2E2 2024 In The Books!
Another C2E2 has come and gone, and per usual, it was a blast. There was plenty to see, particularly from a cosplay standpoint – including yours truly:
It was a fun blast from the blast to revisit Vegeta (last done in 2017?!). It was also well received, and we even ran into several other DBZ cosplayers. I also liked how the updated armor came out; and while there were a few parts of the costume I’d change, it exceeded expectations and then some. At the end of the day, it was a great weekend!
posted by Pi Visuals at 1:07 am
Tags: C2E2 , DBZComment
April 4, 2024 : Saiyan Armor Painted White
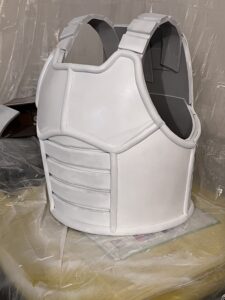
After a few more days/nights of work, the Saiyan armor has been sealed, primed, and (partially) painted. Specifically, the white base has been airbrushed on.
The main outstanding item is painting on the yellow ribs and shoulder straps, which will be applied via a standard brush. The half round dowels also need another coat or two of white paint, applied via brush. They were soaking up the airbrush applications. It seems like they weren’t adequately sealed and/or primed. Bottom line, it’s the home stretch – fingers crossed…
posted by Pi Visuals at 11:29 pm
Tags: C2E2 , Vegeta CosplayComment
February 17, 2024 : Saiyan Armor Progressing
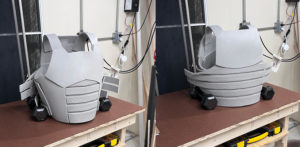
After another night of work, the Saiyan Armor is coming along nicely. The front and back sections are nearly complete and partially connected.
The two sections need to be joined at the sides, and the details still need to be added. When that’s complete, painting can take place – which is a whole other beast. That said, I like where things are at relative to the deadline (late April… C2E2 Babaay!).
posted by Pi Visuals at 1:52 pm
Tags: C2E2 , Vegeta CosplayComment
January 21, 2024 : Vegeta Costume 2.0 Underway
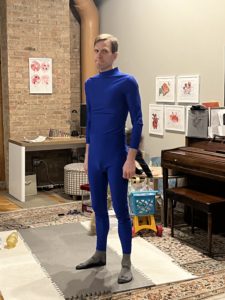
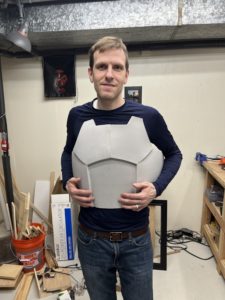
With C2E2 just over three months away, the new build for the Vegeta Costume has begun in earnest. I spent some time in November and December coming up with a plan, buying supplies, and securing the undergarments:
The planning was necessary since I don’t have nearly as much free time as I did 6+ years ago with the first version. With that out of the way, the main lift of the project has kicked off – specifically, building the armor. Fortunately, there are far more resources out there these days for a more efficient (and better) build. Plus, I still have the Goku to my Vegeta working on it with me. Thus far, the front of the armor is moving along:
There is still a fair amount to go with the armor, plus there are all the accessories. These include the hair, gloves, and boots. Some will be repurposed, while others will be redone. Hopefully the end result is an even better look than last time… which will say a lot.
posted by Pi Visuals at 1:24 am
Tags: C2E2 , Vegeta CosplayComment
April 15, 2023 : C2E2 2023 In The Books!
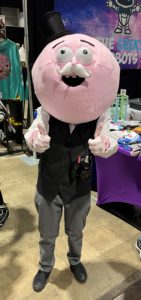
Two weekends ago the joy that is C2E2 took place. I went last Summer, but this was the first Spring C2E2 since 2020… i.e. before the world ever heard of Social Distancing. As expected, it was a fun filled weekend with plenty of great costumes, including this gem:
I only hit one panel, and per usual, didn’t buy any artwork; but all felt right with the world. I must say the DBZ cosplay felt underrepresented. That prompted me to at least consider dusting off the Vegeta costume for next year (April 26-28!) with my Goku wingman. We’ll see if it comes to fruition, but to be honest, it’s something I’ve thought about the past few years. We last dressed up in 2017!
posted by Pi Visuals at 12:27 am
Tags: C2E2 , DBZComment
April 6, 2018 : C2E2 2018 This Weekend!
C2E2 2018 starts today, and it will be the fourth straight year I’ll be in attendance (and the third where I’ll hit all three days). As usual, there are some interesting looking panels, and there are always cool artists and merchandise booths to check out.
Sadly, I won’t partake in any cosplay this year. I just didn’t have any time to come up with an idea (not to mention actually making the costume). But that won’t stop me from enjoying other people’s excellent work.
posted by Pi Visuals at 8:50 am
Tags: C2E2Comment
October 8, 2017 : Dragon Soul Piano Cover – Making Of
Making the Dragon Soul Piano Cover video was fun, but it did come with its challenges. Most of this came after shooting the video.
Some preliminary work was needed prior to shooting (outside of making the costumes, of course). The biggest was determining the best location for the mic. After some testing, the answer was on the book shelf, to the right of the screen behind a few books.
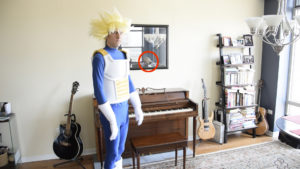
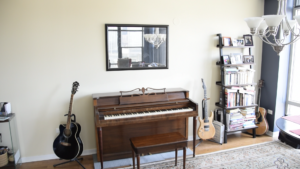
The other thing was setting up the shot. However, I wish I was more thorough with this. While I like the camera angle, I should have removed the mirror. The reason:
I should have realized the mirror was going to cause problems; and while I could have left things as is, I felt the presence of this Photo Bomber was too distracting.
On the bright side, I used this distraction (let’s call her Mary) as an excuse to do some masking/ rotoscoping. While tedious, it’s still a worthwhile skill to keep sharpened.
The first step in removing Mary from the video was creating a Mary-Free image in Photoshop. This was done rather easily with the Clone Stamp Tool:
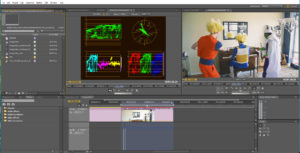
The next step was removing Mary frame by frame. This required the use of masks in After Effects, and keyframing their position whenever somebody walked in front of Mary. This was admittedly a bit of a time suck: but after a decent amount of effort, I was happy with the final product:
Fortunately, once Piccolo came in the shot, he obscured our unwitting Photo Bomber. As such, I didn’t have to do this for the entire 90 seconds. It was closer to about 40 seconds.
There were a few other steps that had to be done. These included:
   • Reviewing The Takes: Playing piano in those gloves was not easy. It took several attempts before I got a satisfactory take. I believe out of 7 tries, there were only two takes where I didn’t cut early due to mishaps. Since the camera kept rolling throughout, I had to review and document where these were.
   • Audio Editing/ Mixing: Even though a good location for the mic was determined prior to shooting, I still took the audio into Audition and did a little mixing to boost the overall sound quality. As always with mixing, I could have spent even longer on it, but I had to know when to say when.
   • Add SFX: It was subtle, but I wanted to enhance the video with a few subtle sound effects. The most obvious was the ‘Whoosh’ around 0:04, but the footsteps and squeaking sound when I sat on the piano bench were also added after the fact. The other big thing was adding a ‘Room Tone’. This subtle background noise was present when the piano wasn’t playing and helped the transition between silence and music.
   • Color Correction: I have not had much experience with Color Correction, and this was a perfect time to get more acquainted. Ideally, I wanted to give Adobe Premiere’s Lumetri Scopes a whirl. Unfortunately, that wasn’t an option this time around. Instead, I used some basic Contrast, Brightness, and Fast Color Correction settings to boost things up. I also got a better handle on the Waveforms and Scopes that detail the video’s color palette.
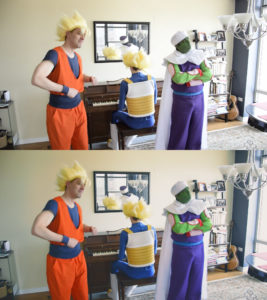
The adjustments were more subtle, but I used it more as a learning exercise while still tweaking things. Quickly: I lowered the brightness, increased the contrast, added some red/ orange to the highlights and midtones, and gave a slightly redish tint to the shadows. In the image below, the image on top is the original, while the bottom image is the color correction:
I normally do editing for animation projects in Sony Vegas, however I wanted to stretch myself a bit and use Adobe Premiere – something I have only a little experience with. I feel it provides more control with color correction, even without the Lumetri Scopes. Fortunately I was familiar enough with the software that it wasn’t much of a learning curve.
Overall, I am very happy with the end result for the video. The material is definitely esoteric, but I love it. Specifically, the dancing cracks me up as well as the interchange between Goku and Piccolo. Plus, I love the song (both playing it and listening to it).
The project provided a lot of fun exercises and yielded a video I thoroughly enjoy. Hope you agree – and found this post informative.
posted by Pi Visuals at 1:47 am
Tags: After Effects , C2E2 , DBZ , Dragon SoulComment
September 29, 2017 : Dragon Soul Piano Cover (in Cosplay)
This Spring not only did I make my usual trek to C2E2, but I also spent a day doing some Cosplaying for the first time (the previous Halloween actually served as a trial run for the costumes).
In addition to enjoying the experience (the costumes were very well received), I also shot a short video that mashed my love of the DBZ theme song, Dragon Soul, with our Cosplay theme. I finally got around to uploading it:
I hope to make another post in the next week that details the efforts put into making this video. I didn’t just record it and throw it online. Multiple steps were taken after the fact to improve the quality as well as address issues that arose.
In the meantime, enjoy the silliness!
posted by Pi Visuals at 11:05 am
Tags: C2E2 , DBZ , Dragon Soul , Halloween , PianoComment
January 13, 2017 : Costume Tweaks For C2E2 – Gloves
I was very proud of last year’s Halloween Costume . That night was actually a trial run for a day of Cosplaying at this Spring’s C2E2 (Chicago Comics & Entertainment Expo). The run through went well, but a few tweaks were identified.
One of these alterations was the gloves. The original set was created from a spandex suit, thin EVA foam, and a good deal of adhesive. It wasn’t the most stable (or comfortable) concoction. I wanted to make a new pair that was strictly fabric, sewn together.
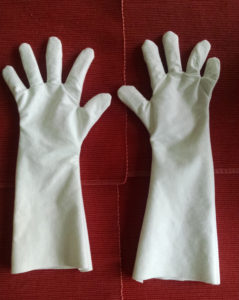
So after purchasing a sewing machine, learning the basics of sewing, and doing some research online; I was able to make some acceptable gloves. Below is a screenshot of the unfinished gloves:
The material used for these was flannel. I considered using a 4-way stretch fabric but was happy with the durability this provided. IÂ still need to hem the edges at the forearms as well as Scotchgard them, but I am happy with the final product. There are a few things that could be improved, but I have decided it would be a better use of my time to focus on other aspects of the costume that need work.
posted by Pi Visuals at 2:42 pm
Tags: C2E2 , HalloweenComment

