January 19, 2020 : After Effects In All Its Glory
The first half minute of the new short is moving along, and several sequences required a good deal of After Effects work. One particular shot that just wrapped up was particularly heavy, and I liked how it came out. As such, I decided to create a quick gif (note you might need to click on it to animate):
Lightwave and After Effects work is done for the first 35 seconds. Before animating new scenes, the plan is to add sound effects and review the overall pacing. I really want to make sure the flow works, particularly since the initial shots set up the rest of the story.
posted by Pi Visuals at 12:37 am
Tags: After Effects , Lightwave , MeAndMeComment
March 1, 2019 : How Animation Gets Done (Video)
Not a lot of people know how Animation gets made. To help enlighten the masses on the process, I created a quick video that shows what is entailed:
This nonsensical bit was made for a quick presentation I had to give. It did have a deadline, which meant I couldn’t tighten up a few of the movements – but I still get a kick out of watching it.
posted by Pi Visuals at 11:16 pm
Tags: After EffectsComment
July 25, 2018 : Walking Through A Portal – Animation Testing
Building off an earlier post, I spent some time having a character walk through my cartoon portal. Below is the end result (with sound effects):
You might recognize the character from a previous animated short, which was actually the inspiration for the portal idea. That earlier project is nearly 5 years old (?!). Since then, I have made numerous improvements to my rigs. However, I didn’t feel it prudent spending time creating a new or updated character at this juncture of testing.
Overall, I like how things came out. I might tweak a few things when I actually create the portal for realsies, but I like the After Effects portions used. Plus, I feel the audio really pulls everything together.
posted by Pi Visuals at 3:35 pm
Tags: After Effects , Lightwave , MeAndMe , UltraComment
July 13, 2018 : Cartoon Portal Fun
For a while now, I have wanted to create a Cartoon Portal. I had some time lately so I tested around with some things in After Effects. Below is the final result (with sound effects!):
One piece of line art was made in Illustrator and used as the basis for the various layers.
I still need to send something (or someone) through the portal, but I don’t think it’s ready for that just yet. The technology is still in the beta stages and will require more testing. Just kidding – that is the next step. I intend on using a previously made Lightwave character.
posted by Pi Visuals at 10:10 am
Tags: After Effects , Illustrator , Lightwave , MeAndMeComment
June 1, 2018 : Long Overdue Reel Update
Many people I know (myself included) often say they need to update their reel. This has been on my To-Do list for quite some time, which is why I’m happy to share the link below:
As with my previous reel, I wanted to do something different with the music. This time around, I used Jazz Chord Progressions and mixed them with non-instrumental synth sounds. It took some time getting it to a place with which I was happy, but I like the end result.
posted by Pi Visuals at 8:41 pm
Tags: After Effects , Cinema 4D , Client Work , LightwaveComment
May 20, 2018 : Hopping On The ‘Whiteboard Animation’ Train
Whiteboard Animations are quite the craze these days. Actually they have been popular for a while now. I’ve never made one before, but I am currently working on one for a client. I could probably use After Effects, but there are multiple software packages that specialize in the creation of these types of videos – which are more efficient.
Per the client’s request, I am using VideoScribe. It is subscription based software (what isn’t these days?), and a cheap one at that. It cost me $29 for a month of use, and it would have been less than half of that had I purchased the Yearly Plan.
This is the first time using such a program so I can’t really compare to its competitors; and while it isn’t perfect, so far it seems to do the job. I am sure there are more robust packages out there to create really complicated animations, however I have been able to couple the resulting animation with After Effects to add on a few bells and whistles and make things look solid.
I can’t say this genre is my favorite, but the project has been a nice change of pace and a fun challenge.
posted by Pi Visuals at 8:34 pm
Tags: After Effects , Client WorkComment
March 14, 2018 : Happy Pi Day!
You know what day it is? Of course you do – it’s the nerdiest day of them all, and this year it has been made extra nerdy special with an animation:
After you re-watch (and share) the video several times, be sure to reflect on the awesomeness that is Pi. Although, if you come to this site, I guess you already do that. Then again, if you regularly visit this site, you are probably fictional. Either way, Happy Pi Day!
posted by Pi Visuals at 1:14 pm
Tags: After Effects , Cinema 4D , PiComment
February 14, 2018 : Animated Sequence Cut But Not Forgotten
A recent project was rather involved and had a lot of different animated sequences. There were plenty of moving pieces during Production, including re-writes to the script and storyboard.
As things progressed, it became evident that some of the sequences no longer fit the video’s overall message and had to get cut. Below is one such sequence that I particularly enjoyed:
All the animation was done in After Effects, while the icons were designed in Illustrator.
It was a bummer the client decided to ax the clip – albeit totally understandable. On the plus side, the animation was already complete so I kept it and plan on putting it on my reel.
posted by Pi Visuals at 11:11 pm
Tags: After EffectsComment
December 16, 2017 : The Iterative Process Of Client Work
A little over a month ago, I took on a small Logo Animation Project for a tax software company. The video was to be played at a conference for employees during the CEO’s speech. As is usually the case, it was an iterative process – requiring multiple versions and revisions before the final video was delivered. The project was fun, and it evolved throughout its short life. Below is a recap of most of these versions to show its development:
There were certain elements of the earlier versions I really liked (the timing and movements would have needed tightening if they were to remain). However, the purpose of the video was to help convey a message, and the client didn’t want it to infer anything else. As such, things were cut and revisions were made.
The Client’s reasoning for each decision made perfect sense, and I made sure to move the project along to fit their vision. They know their brand, and it wasn’t my job to question that (for the record, they were very pleasant to work with).
The video’s final movements and timing played slower than my initial versions, but this wasn’t a Michael Bay movie. It was played during a CEO’s speech about a company merger at an employee based conference. So once again, the client is right. Plus, I’m not sure I would have wanted to be involved in a Michael Bay project. After The Last Ship, he’s got nowhere to go but down…
posted by Pi Visuals at 1:12 am
Tags: After EffectsComment
October 8, 2017 : Dragon Soul Piano Cover – Making Of
Making the Dragon Soul Piano Cover video was fun, but it did come with its challenges. Most of this came after shooting the video.
Some preliminary work was needed prior to shooting (outside of making the costumes, of course). The biggest was determining the best location for the mic. After some testing, the answer was on the book shelf, to the right of the screen behind a few books.
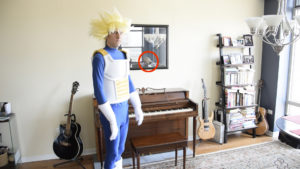
The other thing was setting up the shot. However, I wish I was more thorough with this. While I like the camera angle, I should have removed the mirror. The reason:
I should have realized the mirror was going to cause problems; and while I could have left things as is, I felt the presence of this Photo Bomber was too distracting.
On the bright side, I used this distraction (let’s call her Mary) as an excuse to do some masking/ rotoscoping. While tedious, it’s still a worthwhile skill to keep sharpened.
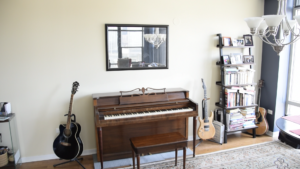
The first step in removing Mary from the video was creating a Mary-Free image in Photoshop. This was done rather easily with the Clone Stamp Tool:
The next step was removing Mary frame by frame. This required the use of masks in After Effects, and keyframing their position whenever somebody walked in front of Mary. This was admittedly a bit of a time suck: but after a decent amount of effort, I was happy with the final product:
Fortunately, once Piccolo came in the shot, he obscured our unwitting Photo Bomber. As such, I didn’t have to do this for the entire 90 seconds. It was closer to about 40 seconds.
There were a few other steps that had to be done. These included:
   • Reviewing The Takes: Playing piano in those gloves was not easy. It took several attempts before I got a satisfactory take. I believe out of 7 tries, there were only two takes where I didn’t cut early due to mishaps. Since the camera kept rolling throughout, I had to review and document where these were.
   • Audio Editing/ Mixing: Even though a good location for the mic was determined prior to shooting, I still took the audio into Audition and did a little mixing to boost the overall sound quality. As always with mixing, I could have spent even longer on it, but I had to know when to say when.
   • Add SFX: It was subtle, but I wanted to enhance the video with a few subtle sound effects. The most obvious was the ‘Whoosh’ around 0:04, but the footsteps and squeaking sound when I sat on the piano bench were also added after the fact. The other big thing was adding a ‘Room Tone’. This subtle background noise was present when the piano wasn’t playing and helped the transition between silence and music.
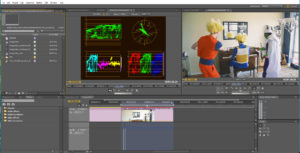
   • Color Correction: I have not had much experience with Color Correction, and this was a perfect time to get more acquainted. Ideally, I wanted to give Adobe Premiere’s Lumetri Scopes a whirl. Unfortunately, that wasn’t an option this time around. Instead, I used some basic Contrast, Brightness, and Fast Color Correction settings to boost things up. I also got a better handle on the Waveforms and Scopes that detail the video’s color palette.
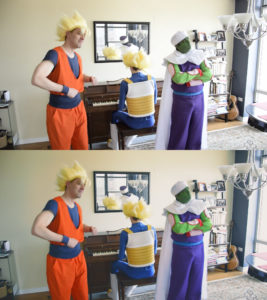
The adjustments were more subtle, but I used it more as a learning exercise while still tweaking things. Quickly: I lowered the brightness, increased the contrast, added some red/ orange to the highlights and midtones, and gave a slightly redish tint to the shadows. In the image below, the image on top is the original, while the bottom image is the color correction:
I normally do editing for animation projects in Sony Vegas, however I wanted to stretch myself a bit and use Adobe Premiere – something I have only a little experience with. I feel it provides more control with color correction, even without the Lumetri Scopes. Fortunately I was familiar enough with the software that it wasn’t much of a learning curve.
Overall, I am very happy with the end result for the video. The material is definitely esoteric, but I love it. Specifically, the dancing cracks me up as well as the interchange between Goku and Piccolo. Plus, I love the song (both playing it and listening to it).
The project provided a lot of fun exercises and yielded a video I thoroughly enjoy. Hope you agree – and found this post informative.
posted by Pi Visuals at 1:47 am
Tags: After Effects , C2E2 , DBZ , Dragon SoulComment


