November 12, 2014 : Behind The Scenes – Raining Platform Part 3: Lightning Effect
The next subject in the Raining Platform’s Behind-The-Scenes thread is the lightning. I wasn’t sure how to simulate the lighting flash associated with lightning so I did some research. Prior to any work in After Effects, I searched for examples in animation as reference. I found them in American Dad (G-String Circus) as well as multiple South Park episodes (most notably, Professor Chaos).
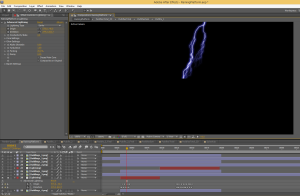
Once in After Effects, the first step was to create the lightning bolt. This was fairly simple with AE’s ‘Advanced Lightning’ effect. The settings were pretty self explanatory but required some testing to get things exactly how I wanted. Below is a screen shot of the lightning. The bolt only needed to extend halfway down the screen since the foreground buildings would obscure the rest of the view.
At the bottom of the screen, you can see two main sets of keyframes – which represent the two lightning strikes during the short. The ‘Origin’ and ‘Direction’ parameters were varied during these stretches to animate the bolt.
The next step was to create the drastic lighting associated with the lightning bolt. Below shows these two extremes.
The lightning flash effect was just duplicated layers with a color correction applied. For the character and sign, the layer was significantly darkened. Conversely, the platform, buildings, and sky were brightened. The trick here was to determine an easy way of toggling between the lightning ‘on’ and ‘off’ extremes.
This was done by first creating a hidden dummy layer. This layer’s opacity was keyframed to indicate when the flash was to be employed (basically going from 0% to 100%). A simple expression was added to the duplicated layers (that represent the extreme), which would link their opacity to this dummy layer. The image below helps illustrate this:
Layer 8 (‘LineArt.png 2’) is the dummy layer. On the right side of the image, you can see the two lightning strikes. By adding the expression at the bottom of the image, Layer 9 will track with the dummy layer. Layer 9 was a severely darkened version of the character so I decided to have its opacity only 85% of the dummy layer’s opacity.
This layer sits on top of the original LineArt layer. As such, with only 85% opacity, some of the original character image is still visible. The top part of the above image shows when there is no lightning (the dummy layer is 0% and so is the darkened LineArt layer). Similarly, the bottom part of the image shows the lightning flash (the dummy layer is 100% and so the darkened layer is 85%). The Opacity for Layer 9 is in red because it is linked to Layer 8 via the expression. The ‘on’ and ‘off’ keyframes were typically two frames apart. Although, to ensure the timing of the flashes weren’t too uniform, I occasionally made it more abrupt and had them right next to each other.
Each layer had a different ‘factor’ as to how it correlated with the dummy layer. While the LineArt layer mentioned above used .85, many used a factor of 1 and some used another value. This was something I had to test out for each layer. The great thing about using the dummy layer and associated expression is when I had to tweak the timing of the lightning flash, I only had to adjust the keyframes in the dummy layer. The rest of the flash layers did not have to be touched.
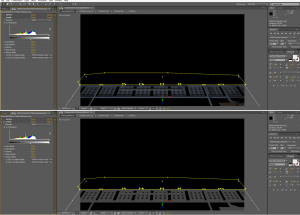
The last step was to create the shadows of the railing, sign, and character that transposes onto the platform. The process for this was similar to the other layers described above, however, it required an extra step. The duplicated layers were converted to 3D layers and then rotated to match the angle of the shadow on the platform. I also had to mask out unwanted parts of the image. The layer then gets de-saturated with the Levels effect, and it is ready to be used as a shadow (with an opacity around 50%). The image below shows the layer with and without Levels.
This process was also done for the Line Art layer to create the character shadow on the platform, which wraps up the work needed to create the lightning and its flashes. I definitely learned a good amount in the process, and it wasn’t overly time consuming. I believe using the expression saved a great deal of time since it made it easier to visualize the final product of the lightning flashes and then tweak as necessary.
The next, and last, post will cover the fake lighting for the light posts. I was pleased with the technique used to get the desired look and wanted to share it.
posted by Pi Visuals at 1:41 pm
Tags: Behind The Scenes , Raining Platform


